
데이터 꿈나무
[데이터 청년 캠퍼스] CNN을 이용한 모델링(VGG16 모델) / 스타벅스 이미지 분류 모델 본문
안녕하세요~ 이번 포스팅은 저번 포스팅에 이어서 본격적으로 CNN의 VGG16 모델을 적용하여 이미지 분류 모델을 구현해보려고 해요~! 저번 포스팅은 모델링 전에 거쳐야 할 단계인 이미지 사이즈 전처리 하는 방법을 포스팅했었는데요,
저번 포스팅이 궁금하시다면 아래의 링크를 클릭해주세요!

[데이터 청년 캠퍼스] 딥러닝 VGG16 모델 구현 이미지 전처리 with Python
안녕하세요~ 데이터 청년 캠퍼스를 수료한지 벌써 4개월이 지나가는데요, 개강을 하고 바쁜 현생을 살아가느라 아직 데청캠에서 했던 활동 포스팅을 마무리를 못했네요ㅠㅠ 대학교 사망년은 참
risingdata.tistory.com
📌 모델 구조 확인하기 및 라이브 불러오기
# 사전학습 모델 불러오기: keras에서 class 형태로 제공
from tensorflow.keras.applications.vgg16 import VGG16

model = VGG16(weights = "imagenet", include_top = True)  # 사전학습 모델을 그대로 사용하기 때문에 True로 설정
model.summary()
VGG16 모델을 사용하기 위해 필요한 패키지를 불러온 후, weight, include_top 파라미터를 설정해주었다.
1. weight 파라미터
● imagenet : 이미지 넷에 최적화된 기본 파라미터로 사용
● none : 초기화된 상태로 사용

2. include_top 파라미터 : 사전 학습 모델에서 top 부분에 해당하는 것을 사용할지 사용하지 않을지 여부를 결정.
위 그림에서 dense layer가 있는 노란색 부분을 top 부분이라고 한다. True로 설정할 경우 해당 부분을 포함해서 불러온다.
여기에서는 사전 학습 모델을 그대로 사용할 것이기 때문에 True로 설정하였다.

※ 추가 정리
- top layer : 최상위 층 레이어(출력층 레이어)
- top layer(=include_top)를 True로 해놓으면 해당 레이어까지 포함해서 학습을 시키는 것
- top layer(=include_top)를 False로 하면 출력층 근접 레이어는 빼고 모델을 학습시킴. 그래서 우리가 레이어를 새로 만들어서 우리 데이터에 맞게 학습시키는 것
- 레이어를 만들어 주는 방법에는 input shape, maxpooling, flatten과 같은 것들을 넣어서 만들어준다.
📌 이미지 불러오기
from tensorflow.keras.applications.vgg16 import preprocess_input
from keras.preprocessing import image
from PIL import Image
from tensorflow.keras.applications.imagenet_utils import decode_predictions
from tensorflow.keras.applications.imagenet_utils import preprocess_input
img = Image.open("/content/drive/MyDrive/데이터청년캠퍼스_4팀/스타벅스_이미지_분류모델/top_10_all/Iced_Caramel_Macchiato/Iced_Caramel_Macchiato_150.jpg")
plt.imshow(np.asarray(img))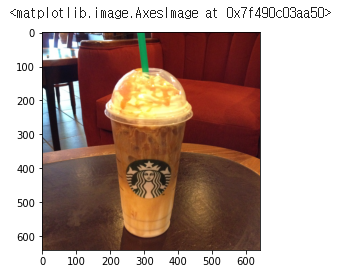
# 위에서 사용한 640x640 크기들이 이미지를 사용
img.size

# 출력
(640, 640)📌이미지 전처리
center crop 방식을 이용하여 짧은 변을 기준으로 정사각형 형태로 만든다. crop 후 크기를 확인해보면 640x640 형태임을 알 수 있다.
w, h = img.size
s = min(w, h)
y = (h - s) // 2
x = (w - s) // 2

print(w, h, x, y, s)
img = img.crop((x, y, x+s, y+s))

# 4-tuple defining the left. upper, right, and lower pixel coordinate
plt.imshow(np.asarray(img))

print(img.size)  # (640, 640)
# vgg16이 입력받는 이미지 크기 확인
model.layers[0].input_shape     # 224x224의 컬러이미지를 입력받는다
# 이미지 resize
target_size = 224
img = img.resize((target_size, target_size)) # resize from 280x280 to 224X224
plt.imshow(np.asarray(img))
print(img.size) # (224, 224)VGG16 모델은 224x224 칼라 이미지를 입력 받는다. 따라서 crop한 이미지를 224 크기로 줄여서 resizing한다.
CNN 모델은 4차원 numpy 형태로 데이터를 입력받기 때문에 이미지를 numpy array로 변경하고, 1차원을 추가한다.
여기에서 shape의 결과는 (이미지 수, 채널 수, 이미지 높이, 이미지 가로)이다.
import tensorflow as tf
from tensorflow import keras
from keras.preprocessing import image

# numpy array로 변경
np_img = tf.keras.preprocessing.image.img_to_array(img)
np_img.shape      # (224, 224, 3)
# 4차원으로 변경
img_batch = np.expand_dims(np_img, axis = 0)
img_batch.shape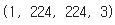
📌 정규화
정규화 전, img_batch는 왼쪽과 같이 0~255 사이의 값으로 구성되어 있다.
이미지 인식 모델에서 학습 속도와 모델 성능을 확보하기 위해서는 정규화를 실시해야 한다.
preprocess_input 함수를 통해 간단하게 실시가 가능하다. 하지만 모형마다 이 함수의 역할이 다르므로 유의할 필요성이 있다.
VGG16 모델에서는 원래 픽셀 값들이 0을 기준으로 centering 된다.
# feature normalization
pre_processed = preprocess_input(img_batch)
pre_processed
img_batch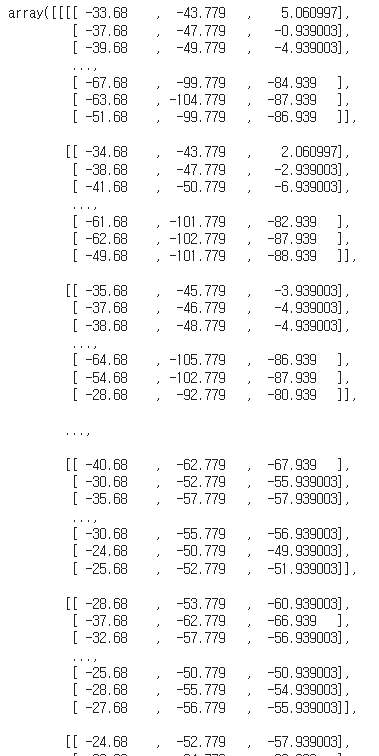
📌 예측하기
y_preds = model.predict(pre_processed)

y_preds.shape     # 종속변수가 취할 수 있는 값이 수 = 1000

np.set_printoptions(suppress = True, precision = 10)
y_preds

# 가장 확률이 높은 값
np.max(y_preds)
decode_predictions(y_preds, top = 10)
가장 확률이 높은 상위 10개 클래스를 출력하면 위의 결과가 나온다.
✅ 모델 구조 변경 방식(2)으로 이미지 분류하기
기존 VGG16 모델을 사용하되, 추가로 몇 개의 layer를 더 쌓고 새로운 데이터로 모델을 학습한다.
즉, 위 그림에서 top layer만을 unfreeze 하고, 기존 모델 부분은 freezing한다.
# 라이브러리, 데이터 불러오기
import tensorflow as tf
from tensorflow.keras.preprocessing.image import ImageDataGenerator
from tensorflow.keras.preprocessing import image
from tensorflow.keras.models import Model
from tensorflow.keras.layers import Input, Flatten, Dense, GlobalAveragePooling2D
from tensorflow.keras.applications.vgg16 import VGG16, preprocess_input
import math
import numpy as np
from tensorflow.keras.preprocessing import image

from tensorflow import keras
from tensorflow.keras import preprocessing
from tensorflow.keras.preprocessing import image_dataset_from_directory
# from keras.metrics import AUC
DIR ="/content/drive/MyDrive/데이터청년캠퍼스_4팀/스타벅스_이미지_분류모델"
train_dir = DIR + "/split_image_433/train"
val_dir = DIR + "/split_image_433/val"
test_dir = DIR + "/split_image_433/test"
BATCH_SIZE = 32
IMG_SIZE = (256, 256)
train_dataset = image_dataset_from_directory(train_dir, shuffle = True, batch_size = BATCH_SIZE, image_size = IMG_SIZE)
val_dataset = image_dataset_from_directory(val_dir, shuffle = True, batch_size = BATCH_SIZE, image_size = IMG_SIZE)
test_dataset = image_dataset_from_directory(test_dir, shuffle = True, batch_size = BATCH_SIZE, image_size = IMG_SIZE)
train_dataset
📌 모델 정의
def model_maker():
base_model = VGG16(include_top=False, input_shape=(256, 256, 3))
print(len(base_model.layers))
for layer in base_model.layers[:]:
layer.trainable = False
input = Input(shape=(256, 256, 3))
custom_model = base_model(input)
custom_model = GlobalAveragePooling2D()(custom_model)
custom_model = Dense(32, activation='relu')(custom_model)
predictions = Dense(10, activation='softmax')(custom_model) # Dense(2, )를 Dense(10, )으로 바꿈
return Model(inputs=input, outputs=predictions)
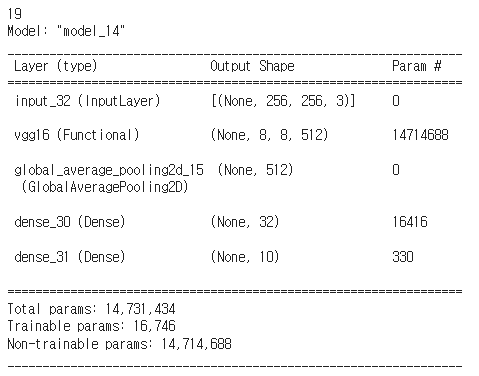
model_final = model_maker()
model_final.summary()
VGG16 모델을 불러오고, include_top=False로 설정한다. 라인 5,6에서 기본 모델에 포함되어 있는 레이어는 학습을 진행하지 않도록 설정한다. 그리고 기본 모델 위에 추가 레이어를 쌓는다. 최종 생성된 모델의 구조는 아래와 같다.
📌 모델 학습
model_final.compile(loss='sparse_categorical_crossentropy',
              optimizer=tf.keras.optimizers.Adam(0.0001),
              metrics=['accuracy'])

## compile the model
# model_final.compile(loss="binary_crossentropy", optimizer=tf.keras.optimizers.Adam(0.0001),
#    metrics=["accuracy",AUC(multi_label = True,num_labels=10,name='AUC')])

history = model_final.fit(
    train_dataset,
    steps_per_epoch = len(train_dataset) // BATCH_SIZE, # number of updates
    epochs=10,
    validation_data=val_dataset,
    validation_steps=len(val_dataset) // BATCH_SIZE)
📌 손실 함수
import matplotlib.pyplot as plt
plt.plot(history.history['loss'])
plt.plot(history.history['val_loss'])
plt.xlabel('epoch')
plt.ylabel('loss')
plt.legend(['train','val'])
plt.show()
📌 정확도
import matplotlib.pyplot as plt
plt.plot(history.history['accuracy'])
plt.plot(history.history['val_accuracy'])
plt.xlabel('epoch')
plt.ylabel('accuracy')
plt.legend(['train','val'])
plt.show()'Activity > 데이터 청년 캠퍼스' 카테고리의 다른 글
| [데이터 청년 캠퍼스] CNN의 ResNet50 모델로 스타벅스 음료 이미지 분류 모델 구현 with Python (0) | 2022.12.25 |
|---|---|
| [데이터 청년 캠퍼스] 딥러닝 VGG16 모델 구현 이미지 전처리 with Python (0) | 2022.12.23 |
| [데이터 청년 캠퍼스] 구글 이미지 자동 스크롤 웹크롤링 with Python (4) | 2022.09.29 |
| [데이터 청년 캠퍼스] 네이버 자동 스크롤 이미지 크롤링 with 파이썬(Python) (2) | 2022.09.25 |
| [데이터 청년 캠퍼스] Python 스타벅스 메뉴 영양성분 크롤링 (2) | 2022.09.17 |


